This is a basic tutorial on how to adjust the valves on the YFZ.
Step 1: Remove front plastics and gas tank.
[attachment=5334 ic1.jpg]
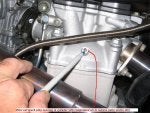
Step 2: Remove ignition coil, oil tank breather hose and cylinder head breather hose.
[attachment=5335ic2.jpg]
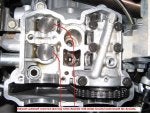
Step 3: Blow out cylinder with compressed air to remove water and/or dirt around the spark plug. Then remove the spark plug. Remove the valve cover.
[attachment=5336ic3.jpg]
Step 4: Remove timing mark and crankshaft access screws.
[attachment=5337ic4.jpg]
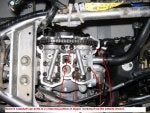
Step 5: Turn crankshaft counterclockwise until the "I" mark lines up with the AC magneto rotor. Verify you're at TDC by making sure the punch marks on the intake and exhaust cams line up with the cylinder head. (This is the stock YFZ timing. Rotate the exhaust cam one tooth clockwise to do the "cam-mod". There are 14 pins between the top two punches and when the cam-mod is done there should be 13 pins between them.)
[attachment=5338ic5.jpg]
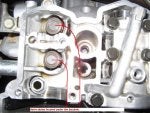
Step 6: Measure the valve clearance with a thickness guage. If the valve clearance is out of spec record the measured reading.
[attachment=5339ic6.jpg]
Step 7: Loosen tensioner cap bolt and remove the timing chain tensioner. This is an optional step because you can release the tension while it's still installed and have enough slack in the timing chain to do what's needed.
[attachment=5340ic7.jpg]
Step 8: Remove camshaft cap bolts in a crisscross pattern in stages working from the outside inward.
[attachment=5342ic9.jpg]
Step 9: Stuff a rag around all the openings in the motor so nothing falls in like the circlips. Secure timing chain to the frame using a wire-tie then remove the camshaft cap and camshaft.
[attachment=5343ic10.jpg]
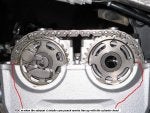
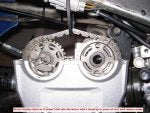
Step 10: Remove the buckets along with the shims using a maganet.
[attachment=5345ic12.jpg]
[attachment=5346ic13.jpg]
[attachment=5347ic14.jpg]
Make sure you keep everything in order and take notes of what bucket had what shim in it and what valve it went to.
[attachment=5348ic15.jpg]
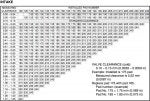
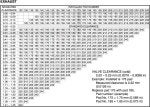
Step 11: Replace shims using the conversion chart provided with the service manual.
![Image]()
Reassemble everything according to the service manual using the proper torque measurements with engine assembly lube or a heavy weight motor oil.
Hope this helps a few people out. And if I missed anything please let me know.
This is a basic outline of how to adjust the valves on the YFZ. ALWAYS refer to your service manual for more detailed instructions because I didn't cover everything in the tutorial.
[attachment=5351icture1_48.jpg]
[attachment=5352icture2_15.jpg]
Step 1: Remove front plastics and gas tank.
[attachment=5334
ic1.jpg]Step 2: Remove ignition coil, oil tank breather hose and cylinder head breather hose.
[attachment=5335
ic2.jpg]Step 3: Blow out cylinder with compressed air to remove water and/or dirt around the spark plug. Then remove the spark plug. Remove the valve cover.
[attachment=5336
ic3.jpg]Step 4: Remove timing mark and crankshaft access screws.
[attachment=5337
ic4.jpg]Step 5: Turn crankshaft counterclockwise until the "I" mark lines up with the AC magneto rotor. Verify you're at TDC by making sure the punch marks on the intake and exhaust cams line up with the cylinder head. (This is the stock YFZ timing. Rotate the exhaust cam one tooth clockwise to do the "cam-mod". There are 14 pins between the top two punches and when the cam-mod is done there should be 13 pins between them.)
[attachment=5338
ic5.jpg]Step 6: Measure the valve clearance with a thickness guage. If the valve clearance is out of spec record the measured reading.
[attachment=5339
ic6.jpg]Step 7: Loosen tensioner cap bolt and remove the timing chain tensioner. This is an optional step because you can release the tension while it's still installed and have enough slack in the timing chain to do what's needed.
[attachment=5340
ic7.jpg]Step 8: Remove camshaft cap bolts in a crisscross pattern in stages working from the outside inward.
[attachment=5342
ic9.jpg]Step 9: Stuff a rag around all the openings in the motor so nothing falls in like the circlips. Secure timing chain to the frame using a wire-tie then remove the camshaft cap and camshaft.
[attachment=5343
ic10.jpg]Step 10: Remove the buckets along with the shims using a maganet.
[attachment=5345
ic12.jpg][attachment=5346
ic13.jpg][attachment=5347
ic14.jpg]Make sure you keep everything in order and take notes of what bucket had what shim in it and what valve it went to.
[attachment=5348
ic15.jpg]Step 11: Replace shims using the conversion chart provided with the service manual.

Reassemble everything according to the service manual using the proper torque measurements with engine assembly lube or a heavy weight motor oil.
Hope this helps a few people out. And if I missed anything please let me know.
This is a basic outline of how to adjust the valves on the YFZ. ALWAYS refer to your service manual for more detailed instructions because I didn't cover everything in the tutorial.
[attachment=5351
icture1_48.jpg][attachment=5352
icture2_15.jpg]